Search This Blog

Showing posts with label Handmade Gifts. Show all posts

Sunday, January 11, 2015

Harry Potter Inspired Gifts

Gryffindor Inspired Infinity Scarf
I did not want an exact replica of the Gryyfindor scarf, because while the recipient is a major HP fan, that is a bit on the nose.  Instead I went with the Gryffindor colors of crimson and gold.

I used a size tewlve Crochet needle, double and half crouchets.
 For yarn colors, I used a cranberry and sunflower.


Snape Inspired Word Art
 Custom Made Digital Word Art from FullerWords


Sunday, October 5, 2014

Bread Dipping Seasoning Recipe

I love practical homemade gifts.  I include this yummy seasoning goes well when included with olive oil, bread plate, and Olive Oil dispenser. 
Or give a whole meal  with  Meal In A Basket gift, including a Dry Soup mix.


Bread Dipping Seasoning Recipe
  • 1 tsp Rosemary
  • 2 tsp Dried Minced Garlic
  • 1 tsp Dried Red Peppers Flakes
  • 1 tsp Dried Oregano
  • 1 tsp Dried Basil
  • 1 tsp Dried Parsley
  • 1/2 tsp Fresh Ground Black Pepper
  • 1 tsp Dried Thyme

Gift Tag for Dipping Seasoning:
Combine 1/2 tsp of seasoning with 2 oz. of olive oil. Allow to stand a few minutes for olive oil to infuse.

Dip Crusty Bread and Enjoy!

Variation: Add one clove of fresh Minced Garlic to oil before adding seasoning.

Italian Tomato & Pasta Soup- Mason Jar Soup MIx

Practical and consumable gifts are always appreciated at my house. I usually have at least four of these in my pantry for quick gifts, or for when I need a quick meal for my own family!

To make a big basket of handmade & consumable gifts ,you can include a few other homemade food-in-a-jar mixes, like homemade apple butter or bread dipping seasoning with loaf of fresh crusty bread. 


How to Assemble Italian Tomato and Pasta Soup 
  • 2 1/2 cups Bow Tie pasta 
  • 2  tbsp dried vegetable flakes (you can find at Whole Foods, I buy them at my local health food store- Garden Patch Market)
  • 1 tbsp dried minced onion flakes
  • 1/4 tsp sugar
  • 2 tsp chicken bouillon granules 
  • 1  tsp dried minced garlic
  • 1  tsp Italian herb seasoning
  • 1/4 tsp black pepper
  1. Place pasta in clean airtight food storage jar (mason jar, ziploc bag). Use funnel for easier preparation.
  2.  Add vegetable flakes, onion, sugar, bouillon granules, Italian seasoning, garlic, and pepper. Close jar or bag.
  3. Cover top of jar with fabric; attach gift tag with yarn or ribbon.
Tip for presentation: Include 1 can (14.5) of Crushed Tomatoes, Parmesan Cheese,  and a small bag of Real Bacon Bits in a bag.


Italian Tomato & Pasta Soup 

  • 1 Jar of Italian Tomato and Pasta Soup mix
  • 5 cups of water
  • 1 can (14.5 oz) of crushed tomatoes
  •  2 to 3 cups chopped fresh spinach (will cook down)
  •  1/4  cup  crumbled bacon  (4 to 6 slices)
  •  1/2 cup of grated Parmesan Cheese
  1. Combine water, Jar mix in large saucepan.Bring to boil for 10 to 12 minutes.
  2. Stir in tomatoes, spinach, and bacon.Reduce heat &simmer for 10 to 12 more minutes or until pasta is tender.
  3.  Serve topped with Parmesan Cheese.
Variations:
 *Substitute fresh spinach for 1/2 package (10oz.) of  frozen spinach, thawed and drained.
*Add or Sub for Bacon – 1 Can (14-16 oz) of  Pinto Beans , rinsed and drained.


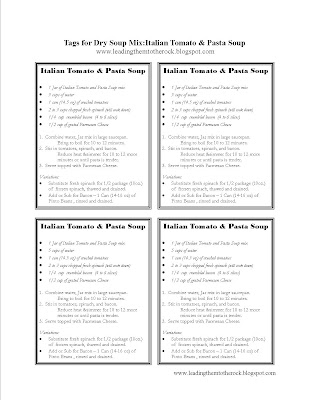
Gift Tag for Soup Mix: 
https://drive.google.com/file/d/0B0bJjUixUNxyQVZPTUVtOFF1VFU/view?usp=sharing


Friday, March 1, 2013

Love/Feet


We made a new canvas inspired by Pinterest.  The one I saw on Pinterest had a valentine's theme, which I didn't really like.  I went with outdoorsy theme and the letter being the "clouds".

It is made from simple Acrylic paints.  Don't forget to buy Acrylic sealer to make it dust and water resistant, this was especially important for us since we put this in the bathroom.

Tuesday, December 25, 2012

FAMILY~Grandparent Christmas Present


My sister-in-law and I came up with a joint present idea for my in-laws.  I have two children and she has four, and since grandparents already love grand-kid pictures, what  better than ALL their grand-kids in one picture?!

By using free boxes from Aldi, and discounted yarn for the letters, this whole gift came together for less than $35!   The frame was the most expensive part of the whole gift.

My mother-in-law cried tears of joy as she opened it.  I was so very thankful we could give her this!


Materials Needed:

1. Cut letters out of cardboard
 Tape printed letter (link to free printable above) to edges of sturdy cardboard.
Use  X-ACTO Knifeto cut on lines to create the letter silhouette. Don't forget to put a  Cutting Mat underneath or you will damage your table.


2. Wrap letter with Yarn 
 We used hot glue to start on bottom of letter, then secured with glue on back as you wrap.  A good tutorial can be found here. 

Tip : On edges, cut the yarn and glue in lines,like this,  instead of wrapping around difficult corners.  You will see on the "L" we had an unattractive big bunch around the corners, but on the "A" we glued them in diagonal  lines.  You may have to click on picture for full size to see difference.


3.  Take & Print Pictures
 For consistency in your pictures, use the same background for each of the kids.  We just used a wide tree in the front yard.

When Printing, I highly recommend black and white, it really makes the letters pop.   We printed  in color and in black & white to test out which we like better. We found the color distracted you from the fact that you were trying to make a cohesive collage that spelled ONE Word.


4.  Mat and Frame
We used buy a six opening collage frame that includes matting at  online. It comes in 3 opening or 4 opening also.  Depending on the amount of grand kids and  you could spell out any type of word:
  • JOY
  • LOVE
  • I <3 u
  • YOUR FAMILY'S LAST NAME
If you have more than 6 kids in your family, consider doubling up in each frame.  For example, have the eldest hold the baby, and the baby holds the letter. Or each child holds one side of the letter.


Thank you for using Affiliate Links.  They keep the blog open, and at no extra cost to you!

Tuesday, December 4, 2012

Stamped Personalized Bookmarks/ Necklaces


I love the industrial look of washers as necklaces, and also the personal touch of names.
 These can given as necklaces, or just as easily be used as bookmarks. Make sure you buy  several extra washers because there will be a certain amount of trial and error.

Main Lesson learned was to use a HEAVY HAMMER.  Do no use a cheap light weight hammer or you will have to pound 20 time for one letter, which leads to the  stamp slipping.


Materials:


1. Stamp letters onto washer


Make sure you use a very heavy hammer.  I tried a cheaper hammer and ended up hitting about 20 times and still not make a clear letter.  With the heavy hammer only 5 to 8 good hits would make the  letter clear. The more  hits you make, the more chances you have of making a mistake with the stamper slipping or dropping the stamper...or worse hitting your finger! 

Personalization ideas:

  • my niece's name
  • my sister's married name and year of they were married on smaller washer
  • meaningful phrase. For two of my young nieces I put the phrase from The Help that the main characters tells the little girl over and over: "U R Kind, Smart & Important" 

2. Use Sharpie on to add contrast to lettering


After using the sharpie, if you mess up a bit, you can wipe it off quickly with wet wipe to get off of surface but leaving the sharpie in creases of stamped letter)


3. Attach to make ornament, necklace, or bookmark

To Make Necklace: In each bag I also included a second length of leather  or second necklace ribbon so they could change the color of necklace depending on outfit.  
I personally think this looks best as just a bit longer than choker length , but I included different and longer lengths so recipients could decide how long they wanted the necklace.


NO SEW~Tie Snakes


Great present to wrap around the tree for Christmas morning!

This project came from having two sons & two nephews who all asked for gifts they could use on "adventures". I threw in a pair of inexpensive binoculars, and you have hours of imaginative fun! I also found a few pink ties, and made these for my nieces!  All kids loved them and played with them all Christmas Morning.


Materials needed:
  • old tie (s)
  • hot glue gun 
  • stuffing from an old pillow
  • googly eyes
  • red felt
  • scissors
  • un-sharpened pencil  and marker


1. Stuff Tie
I first found an old pillow we didn't use anymore and cut it open to harvest the stuffing.  Then  I used the pencil to slowly put small pieces in the snake.  Stuff from one end, and push till you get to the middle; you will need to bunch the tie over the pencil.  Once one side is stuffed, stuff from other side of tie. Push slowly so you don't tear the seams of the tie.

TIP: At the smaller end, do not over stuff end and even leave the end empty to make gluing easier. At larger end leave room to refold side of tie to original triangle shape. A marker is good for ends to, but the pencils gets the stuffing to middle of tie better without breaking seams.


2. Glue Ends
  I used the hot glue guns to close the ends. Make sure when stuffing to not to over stuff because it could tear seams of tie.  I ended up hot gluing middle seam for extra security since I knew the snakes were going to active boys.

3. Decorate
 Glue googly eyes and red felt tongue  to the large end of tie.  If you are giving to girl you could even add some yarn hair or felt bow:) I am thinking if I find a pink tie at the thrift store that my niece may be getting one of these next year:)


Thank you for using affliate links. They help me keep the blog open, at no extra costs to you!

Monday, December 27, 2010

Mason Jar Meal in a Basket


For Christmas Presents this year I made a meal in basket. These baskets would also be an ideal house warming gift or present for a new mom. 


Each basket includes:
Suggested additions: 


Christmas Gifts Preschoolers Can Make

Every year I have the kids help with Christmas Presents for our family.It seems to give them a sense of ownership in the giving process, and in turn giving them experience of the joy of giving.
 The materials I used were all art materials I already had in my house. We may not have spent a lot of money on these, but the couple of hours that went into them was part of the gift we gave to our friends and family.


HAND PRINT TAGS
After we explored with green paint I helped the boys make some handprints that were used for labels for our annual puppy chow bags. Daddy made the puppy chow this year because I was sick and didn't wan to infect out entire extended family!


FINGER-PAINTED CHRISTMAS ORNAMENTS/BOOKMARKS 


We first started our 2010 Kid-Made Christmas Projects with SEVERAL finger-painting sessions. I would not recommend trying this all in one session, or you will burn out your kids and yourself. For a really cute addition, print pictures of your kids fingerprinting to include with the bookmark.

 We didn't have green finger paint, so it was a great time to learn how yellow and blue make green. Just let the kids explore the paint.  Let dry and cut out trees.


On a different day, we did some Easel Painting for the backdrop of our our ornaments. You can just as easily do some red finger-painting to do the background, but I found this great easel at Goodwill and the boys love any excuse to paint with it.


I finished the bookmark/ornaments by mounting them on construction paper, putting contact paper over each one, then attaching some embroidery thread we already had in the house.